How to Make Laser Cut Wood Signs (xTool M1 Tutorial)
This post may contain affiliate links. Read the full disclosure
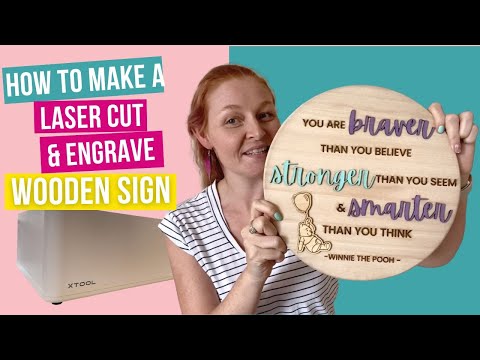
Do you want to know how to make laser cut wood signs at home? This is the tutorial for you! I share with you how I created this super cute Winnie The Pooh wooden quote sign and how you can make your own similar laser-cut signs.
Wooden laser engraved and cut signs are such a fun way to decorate your home or give as handmade gifts. This can be a surprisingly simple beginner project for laser cutting. This one took me around an hour all up, including paint drying time!
For the purpose of this tutorial, I am using my xTool M1 hybrid laser engraver and cutting machine, but you can use any desktop laser machine to recreate this project.
 1")
How To Make Laser Cut Wood Signs
When you are just learning how to use a laser cut machine, it can be quite daunting!
I felt very overwhelmed but this wooden sign was my 4th project after starting with a couple of really easy beginner M1 projects. And it turned out so well. I love it so much.
The inspiration for this particular wooden laser engraved sign was for my great niece’s first birthday. The theme was Winnie The Pooh and I just loved the idea of having this quote on display in her room as she grows up.
‘You are braver than you believe, stronger than you seem and smarter than you think’.
Supplies You Need For Layered Laser Wood Signs
For this laser cut wood sign tutorial, there are a few basics you’re going to need to get started.
Of course, the main thing you’re going to need is a laser machine, if you don’t already have one. You might just be in the research phase of learning what cool things you can make.
If so, the xTool M1 laser cutting machine is a fantastic beginner’s choice with the ability to cut and engrave wood, metal and many other materials, as well as cutting thin materials with a blade (much like a Cricut machine – it does both).
You will also need the following for your wooden laser-cut sign:
- Wood round – I got mine from Kmart Australia and it was around 30cm in diameter (12 inch) and around 1.2cm thick. You can get similar from most craft stores and Amazon.
- 3mm plywood – Mine was from the xTool premium materials pack but I also have some from Temu and Amazon.
- Craft paints – I love the Kaisercraft paints for craft projects
- Paintbrush
- Craft glue – Make sure it’s suited to gluing wood.
- SVG file – Optional, depending on what you want on your wooden sign.
Laser Cut Wooden Sign Tutorial Video
If you prefer learning by video, check out my complete tutorial. It includes a few of my own beginner errors so you don’t have to make the same ones!
How To Make A Laser Cut & Engraved Sign
To make this particular sign, it is quite simple. I haven’t painted the word before cutting or engraving, instead leaving it with the raw wood look, which was my preference for this project.
If you did want to have your project in different colours, you could paint or stain your wood before cutting or engraving the pieces.
STEP 1 – PLANNING YOUR SIGN
 2")
Before you can start cutting, you need to design your sign. There are a few ways to do this.
You can download a PNG or SVG image from somewhere like Etsy or Creative Fabrica that is ready to use.
You can create your sign within the laser design studio program.
Or you can do as I did and create your design in a program such as Canva.
Canva is a free editing software that I use for almost everything design-related. I used canvas to create a mock-up of my sign, creating a circle then adding the quote words onto it and changing the font.
I then duplicated my mock-up into separate files – an engraving file and cut files, removing the extra sections. I downloaded these as transparent PNG files and opened them in my xTool Design Studio.
For the Winnie The Pooh image, I downloaded this from a free SVG site online, however, Creative Fabrica and Etsy are usually my favourite places to find cool images.
I also used the camera function on the xTool to see how my design would look on my wood round before I started cutting and engraving.
STEP 2 – PREPARE TO CUT
 3")
The next step is to measure and set up your laser machine to cut the wooden words for your sign.
Make sure your plywood is in place. I used the triangular prisms to elevate my wood inside my M1.
Select your material (3mm plywood in this case) and auto-measure the thickness. Open your cut file.
Select outline and change the offset distance to 0. This means it will cut on the exact lines.
Make sure you have cut selected and click framing to make sure everything is good to go. When you are ready, press start on the design software and on your xTool laser.
STEP 3 – ENGRAVE YOUR SIGN
 4")
After your wooden words have been completed, place the wooden round in the machine. Open your engrave PNG/SVG file and line it up how you want it.
Make sure to choose the correct material from the list (or the closest option) and select engrave.
Because I was doing a combination of engraving and cutting for this sign, I placed my laser cut words on the wood round to allow them to show up on the screen. This helped make sure everything was in the correct position before hitting start.
Once you are happy, remove the laser cut words and frame your project. Press start on both the program and the laser.
STEP 4 – CUT AND ENGRAVE SECTIONS
If you are including extra embellishments on your sign, such as the Winnie The Pooh I have included, this includes both of the above steps.
First, open your SVG file and outline it with 0 offset. Choose engrave and line this up on your 3mm plywood, following the same process as you did for step 3.
Once this has finished engraving, don’t move your plywood or adjust your image. Instead, add an offset of 2 and change it to cut. This will cut around your engraved image.
STEP 5 – DECORATE
 5")
If you plan to paint, stain or decorate your laser cut pieces, this is the stage to do so.
I chose to paint my laser cut words using Kaisercraft paints, with a single coat of paint each. For the Winnie The Pooh, I left this as is.
Allow enough time to completely dry.
STEP 6 – GLUE YOUR WORDS
 6")
Using a craft glue that is suited to wood, glue your laser-cut words and images in place and allow them to dry completely.
And that’s it – your super cute laser cut and engraved wooden sign is complete!
Having the ability to create DIY custom gifts such as this is such a game changer when you can actually cut wood and acrylic at home!
While Cricut and Silhouette machines have great capabilities, the laser cutting option is more powerful and does allow you to work with more materials so having a desktop hybrid laser is a great addition to any craft room!
Tips For Making Laser Cut Wood Signs
As a beginner myself, I kept things quite simple for this project, making it a great xTool M1 beginner project. But there are plenty of tips that will make your projects easier and more successful.
- Score your sign if you have lots of cut pieces to place and want to make sure they are placed in the right spots.
- Add double-sided adhesive such as 3M Adhesive to the back of your plywood so you can peel and stick instead of using glue – make sure your machine is capable of cutting through that extra thickness though.
- Using adhesive also means you don’t risk having glue marks on your wood.
- When using different types of wood, try experimenting on a small section or spare piece first to make sure the settings are right.
- If a small section of your laser cuts doesn’t go all the way through, you can try using something pointed to score the rear lines. This can often make your project salvageable.
- Make sure to choose the right material or nearest option in your settings for the best results.
- Find loads of cute personal and commercial use images for your projects on Creative Fabrica or Etsy.
What Is The Best Wood To Laser Cut?
The best wood to laser cut depends on what you’re making.
Plywood is a popular choice of wood for laser cutting as it is relatively cheap and easy to work with. Basswood, plywood and MDF are all great choices for laser cutting.
If you’re looking for a more decorative finish, hardwoods such as walnut, cherry and maple provide a unique look with beautiful grain patterns.
No matter which wood you choose to use, always make sure it is suitable for laser cutting.
A machine such as xTool M1 is limited to 3mm for laser cutting wood. Other machines may have higher capabilities to give you more options.
Hardwoods can be more difficult to cut and may require higher power settings and stronger laser machines, so make sure you test your wood before starting your project.
Other Ways To Decorate Laser Engraved Signs
 7")
When you have a laser cutting machine, you have fairly unlimited options for how you can decorate your custom gifts and making personalised wooden signs is definitely a favourite of mine.
There are plenty of other ways you can add a little touch of personality to your wooden signs (and other wooden laser projects).
Here are some fun ideas:
- Paint your wood before engraving
- Stain your wood
- Stick on artificial flowers and leaves
- Add extra decoration with permanent vinyl
- Attach a ribbon or rope to hang
- Add a large ribbon
- Layer wood embellishments
- Add a ribbon border
Conclusion – Custom Wooden Laser Signs
The beauty of laser engraving lies in its versatility and the limitless creativity it offers. If you are looking for laser cutting beginner projects or want to try something new with your machine, wooden laser engraved and cut signs are a really fun idea. And they make the best gifts!
 8")


