How To Make DIY Acrylic Bookmarks With Cricut
This post may contain affiliate links. Read the full disclosure
Personalised DIY acrylic bookmarks are one of the easiest beginner projects for your Cricut or similar vinyl cutting machine. They are also one of the most affordable DIY personalised gifts to make. In this tutorial, I will show you how to make your own Cricut acrylic bookmarks and a few tips for other ways you can personalise blank acrylic bookmarks too!

Personalised Acrylic Bookmarks
Whether you want to make unique gifts for your bookish friends, gifts for your kid’s friends or teachers, or party favours for a special event, blank acrylic bookmarks are a great starting point for custom gifts that you can make yourself.
With a Cricut machine or similar vinyl cutting machine, you can easily create personalised designs in layered vinyl to suit different themes and personalities.
These Cricut acrylic bookmarks are great if you need a last-minute gift in a hurry or if you want to add a little extra touch to a book gift!
They are the perfect beginner Cricut Joy project, perfectly suited to the smaller-sized machine if you’re just getting started, and equally fun to make on the larger Cricut and vinyl cutting machines.
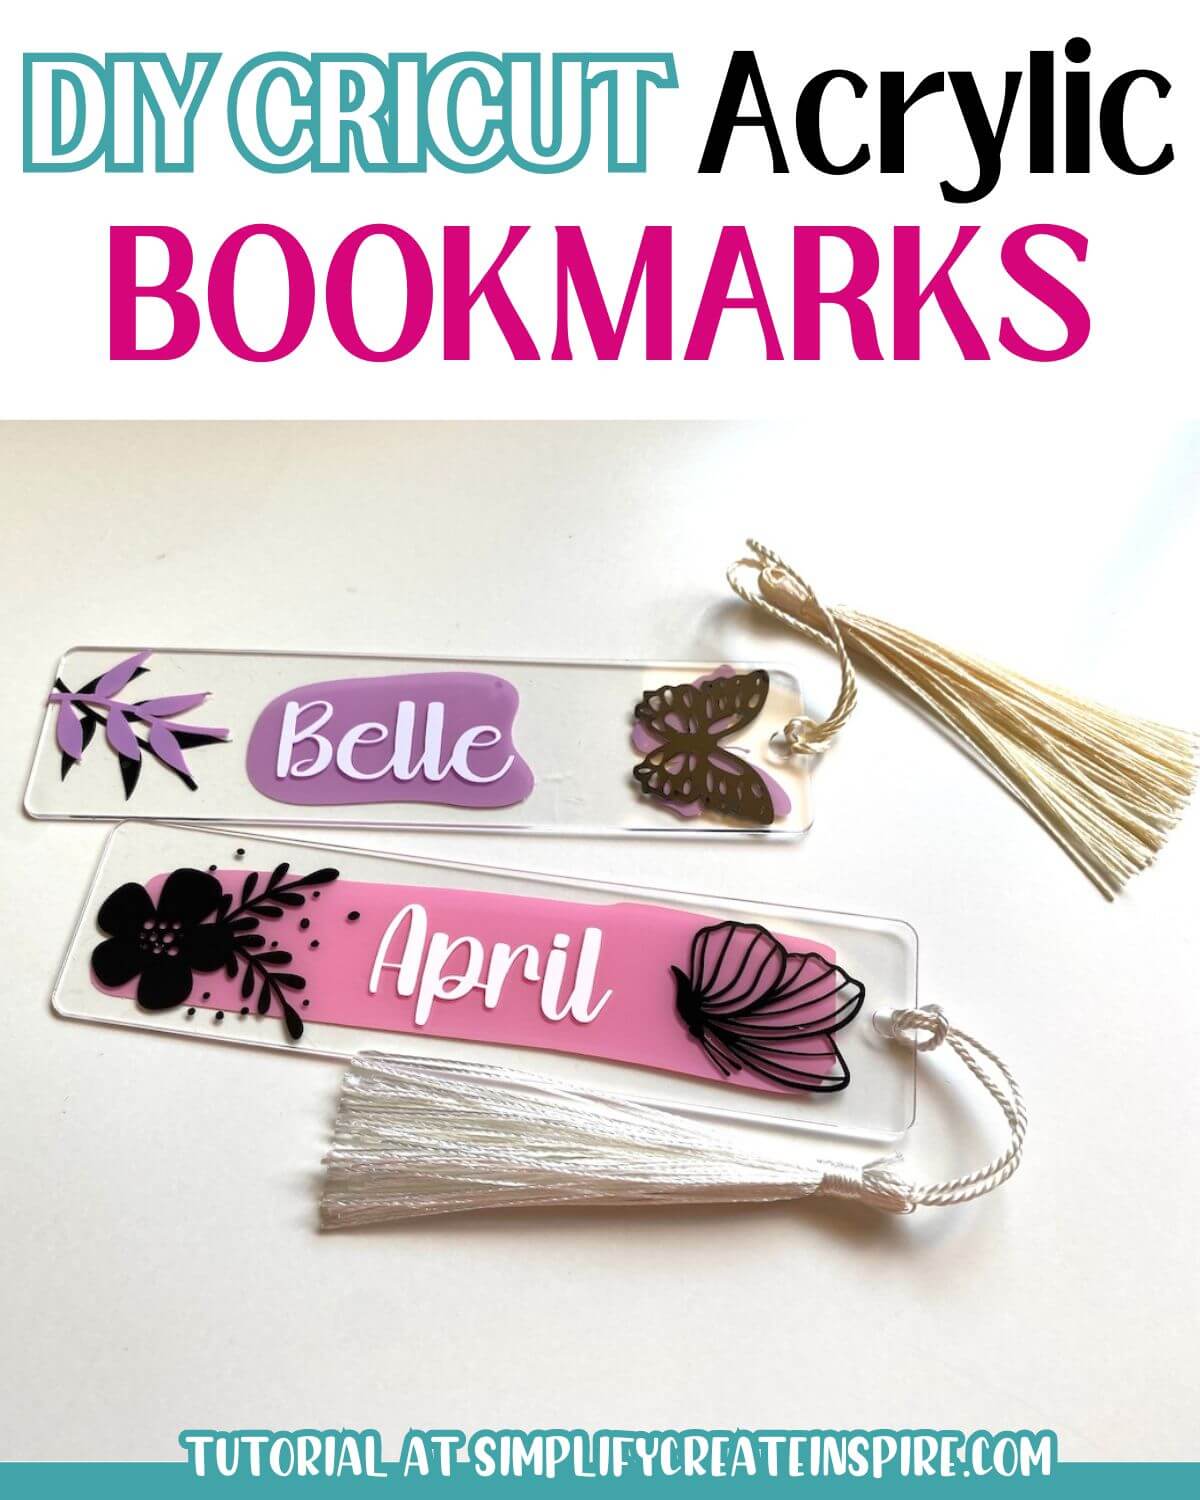
For these acrylic Cricut bookmarks that I created, some were for our Disney Cruise fish extender gifts with a quote from Beauty And The Beast and the others were for end-of-year teacher gifts.
The quote reads – “With a dreamy far off look, and her nose stuck in a book…”. It’s actually a song lyric from the song Belle in the original animated film. A cute bookish line for a Disney adult!
What You Will Need

Here is the list of things you will need to make your own DIY acrylic bookmarks with Cricut:
- Blank acrylic bookmarks: You can purchase acrylic bookmark blanks in various shapes and sizes from your local craft store or online.
- Tassels or ribbons: Optional decorations for your bookmarks. These bookmarks come with tassels.
- A Cricut machine or similar vinyl cutting machine: I used my Cricut Joy but any vinyl cutting machine will work.
- Permanent vinyl: For layering, choose 2 to 3 different vinyl colours for each keyring, in contrasting colours.
- Transfer tape: Adhesive tape will help you transfer the cut vinyl designs onto the acrylic keychain blanks.
- Weeding tool: To remove excess vinyl from your designs.
- Cricut Design Space: This is the software you’ll be using to design and prepare your artwork for cutting. It’s a free online platform provided by Cricut and is compatible with both Windows and Mac.
- SVGs: Optional if you want to use specific designs. You can also create your own designs in the Design Space software.
How To Make DIY Acrylic Bookmarks With Cricut

With just a few simple steps, you can make personalised acrylic bookmarks that make the ideal gifts or party favours for friends and family. Here’s how to make your own Cricut bookmarks:
STEP ONE – Create a New Project in Design Space
Open the Cricut Design Space software and create a new project. Create a shape of the same size as your bookmark.
For example, if your acrylic bookmark blanks are 1.7 inches by 5 inches, create a rectangle of this same size. This will help you plan out your design and ensure it fits.
STEP TWO – Create Your Design
Select, upload or create your design in your design software. You can upload your own design from somewhere like Canva, upload an existing SVG purchased or downloaded elsewhere or use one from the Design Space library.
Or simply create your own design using text and shapes within Cricut Desgn Space. Make sure your design fits the bookmark and adjust it if necessary.
For these acrylic keychains, I used SVGs I purchased from Etsy and Creative Fabrica. I also used shapes from the Cricut Design Space. If you have a Cricut Access Subscription, you will have access to everything in the library, otherwise, you can upload or purchase individual shapes.
I used a few different shapes. ‘Paint Brush Stroke’ M3C71B9FO was a favourite.
Make sure to delete the background shape before you send your design to cut. This was just to make sure we had a guide on how big our design should be.
STEP THREE – Prepare Your Design for Cutting
Once you are happy with your bookmark design, select the appropriate material setting for cutting. I used Cricut Smart Vinyl in white and black, which does not require a cutting mat.
I paired this with a standard permanent vinyl in other colours which did require a cutting mat, so make sure you choose the setting to suit your materials.
Load the permanent vinyl into your machine (with a mat if needed) and follow the on-screen prompts to start the cutting process.
STEP FOUR – Weed and Transfer Your Design

After the machine finishes cutting, carefully remove the excess vinyl using the weeding tool. Cut a piece of transfer tape slightly larger than your design and place it over the vinyl.
Use a scraper tool to firmly press the transfer tape onto the vinyl, making sure it adheres properly.
STEP FIVE – Apply Your Design to the Acrylic Bookmark

Peel the protective layer from your acrylic bookmark blank. Carefully place the design onto the acrylic bookmark, taking care to centre and align it.
Use the scraper tool to apply pressure and transfer the vinyl onto the keychain. Slowly peel off the transfer tape, leaving the vinyl design on the bookmark.
If you are layering your vinyl, repeat this process. For my bookmarks, I applied the long brushstroke shape to the back of the acrylic blank bookmarks and the quote and image design to the front. This gives your bookmarks a cute layering effect.
STEP SIX – Add The Finishing Touches

Add a ribbon or tassel decoration through the hole of the acrylic bookmarks. This is optional but it looks pretty and makes it easier to see where your bookmark is inside your book.
Other Ways To Personalise Acrylic Bookmarks
If you’re looking to add your own personal touch to your acrylic bookmarks, there are a variety of other decorative methods you can try. Here are some tips for personalising bookmarks without vinyl:
- Paint: One option is to use paint to create unique designs on your bookmarks. Instead of using a vinyl brushstroke shape, you can paint directly onto the back of your acrylic bookmark blank and allow it to dry before applying the vinyl. Or you can hand paint designs or use stencils and paint splatters for different looks.
- Resin: Another way to personalize your acrylic bookmarks is by using resin. You can mix different colours or add small decorative items like glitter, dried flowers, or charms to the resin before pouring it into the bookmark blank. Just be mindful that this will make your bookmarks more bulky and that flatter decorations are best.
- Markers and Pens: If you prefer a more intricate handmade design, using markers or pens specifically designed for glass or plastic surfaces can be a great choice. These markers allow you to draw precise lines and add vibrant colours to your bookmarks.
- Decoupage: Decoupage is a technique where you adhere decorative paper or fabric to a surface using a special glue or sealer. You can cut out small designs, patterns, or even personal photos and apply them to your bookmarks for a unique and personalised touch.
- Stickers and Adhesive Embellishments: If you’re looking for a quick and easy way to personalise your keychains, using stickers or adhesive embellishments is a great option. You can find a wide variety of stickers and embellishments in different shapes, colours, and designs, allowing you to customise your bookmarks easily – no Cricut needed. Just be mindful that these will not be as durable as permanent vinyl.
Conclusion: Cricut Acrylic Bookmarks
Making your own DIY acrylic bookmarks with your Cricut is such a fun and easy way to create your own personalised gifts for friends, family, teachers and classmates. These bookmarks are a practical and affordable gift that also makes a great party favour for special occasions such as hen parties, bridal showers, wedding favours or birthday parties.


 11")
